Customize User Interface using Visual Builder
EnableX's Low Code platform provides flexibility in designing your video application to fit your specific needs. To Customize the User Interface of your selected template, follow these steps:
- In the the Customize UI box and click Go.
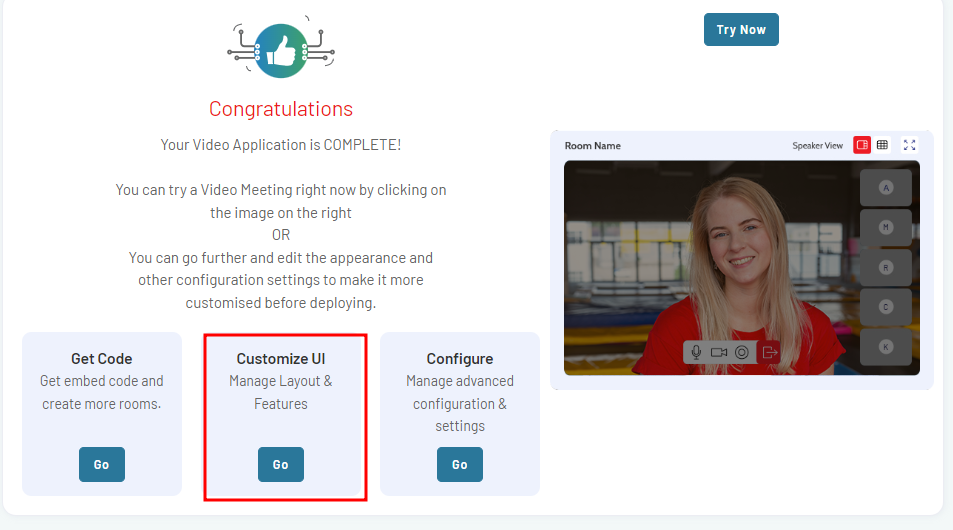
Alternatively, you can follow these steps to navigate to the Customize UI for the selected project:
- Navigate to Video section in the left menu pane and select Dashboard option from the drop-down.
- Select the low code video project for which you want to customize the UI. This will take you to the project summary page.
- On the project summary page, select the Customize UI tab. A new page will open, providing you with the option to Start Customization process.
- Click on START CUSTOMIZATION.
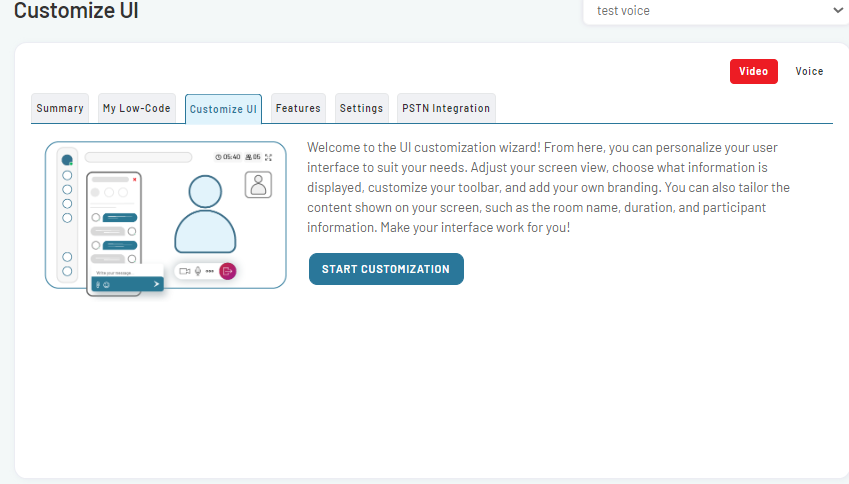
The Edit template page provides options for granular customization of the UI, features, and capabilities. It consists of four tabs, each serving a different function:
-
Screen view: Customize the settings related to the screen view of your video application.
-
Information Display: Configure the information display settings according to your preferences.
-
Toolbar: Customize the toolbar settings, including the available options and functionalities.
-
Branding: Personalize the branding elements of your video application, such as logos and colours.
The UI templates come with pre-loaded features, but you can customize them based on your specific requirements.
These sections will provide detailed instructions on customizing each aspect of the user interface to match your requirements.
Screen View Settings
On the Customize UI page, follow these steps to customize the screen view settings:
-
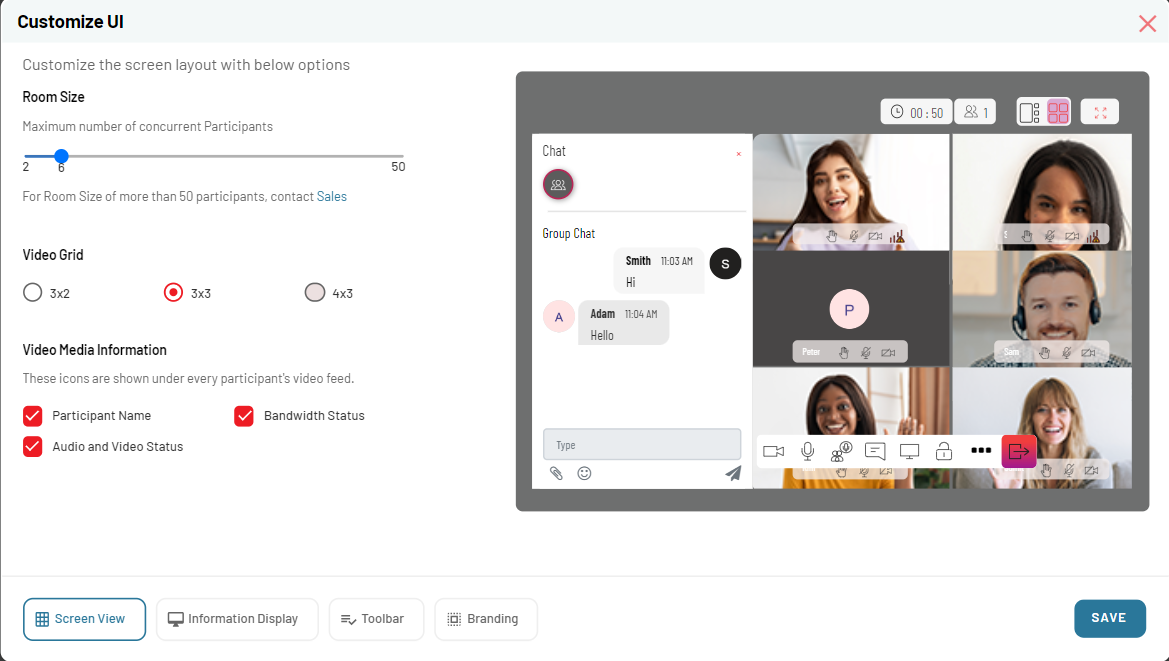
Select the Screen View tab. This tab is usually open by default when you access the Customize UI interface.
-
In the Screen View interface, you will find options to specify the room size, video grid, and video media information.
Room Size
- Specify the desired Room Size by selecting the appropriate value. This determines the maximum number of participants that can join the room, ranging from 2 to 50 participants.
Video Grid layout
- Choose the preferred Video Grid layout. This determines how participant videos will be displayed on the screen. Available grid sizes include 3x2, 3x3, and 4x3.
Video Media Information
-
Select the icons you wish to display under each participant's video feed. You can choose to display:
- Participant name
- Bandwidth Status
- Audio & Video Status.
-
After adjusting the Screen settings to your preference, click the Save button. Your chosen features and functionalities will be enabled immediately. It's that easy!
Note: By default, EnableX allows a room size of 250 participants. Visual Builder provides you the option to select upto 50 participants. If you need to extend your room size, contact our Sales team.
After specifying the screen view settings, proceed to configuring the information display settings.
Information Display Settings
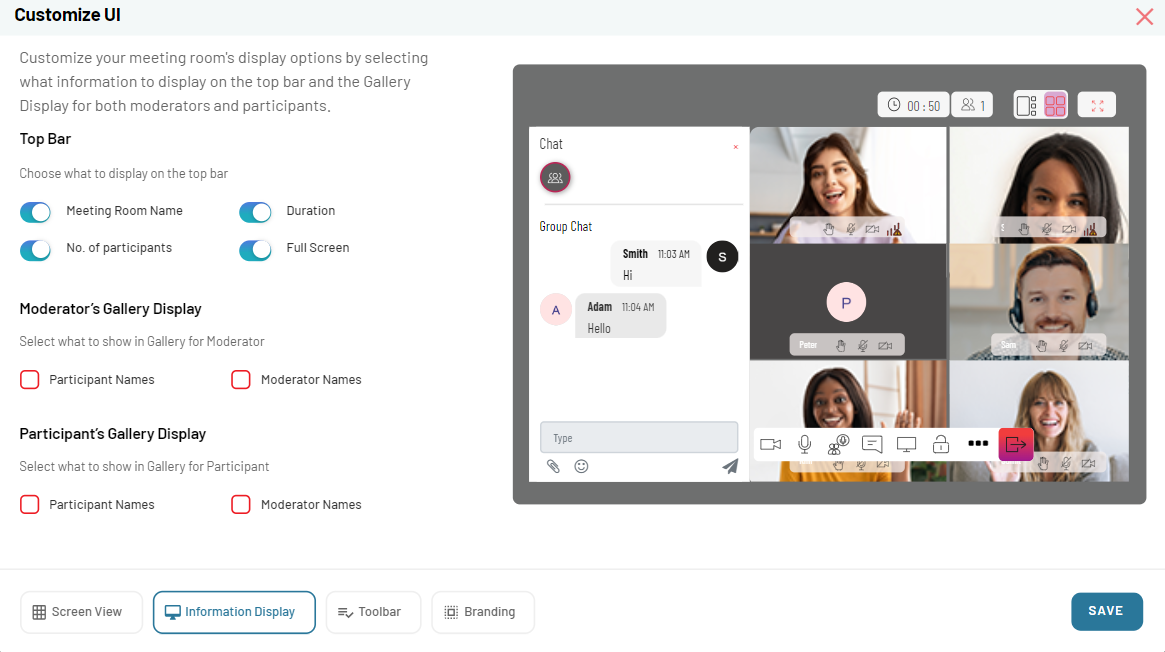
On the Information Display interface, you can customize which features are displayed in the top bar and the gallery display providing participants with relevant information during video sessions.
Follow these steps:
-
On the Customize UI page, navigate to Information Display tab.
-
In the Top Bar section, toggle the options to enable or disable the features that you want to display.
You can choose from the following options:
- Meeting Room name
- Duration
- Number of participants
- Full-Screen
-
In the Moderator's Gallery Display section, select the features that you want to show in the gallery for moderators.
You can choose to display from the following options:
- Participant names
- Moderator names
- Both
-
In the Participant's Gallery Display section, select the features that you want to show in the gallery for participants.
You can choose to display from the following options:
- Participant names
- Moderator names
- Both (Participant & Moderator Names)
-
After making the desired selections, click on SAVE NOW button to save your information display settings.
Toolbar Settings
The toolbar in your video calling application allows you to choose and display the buttons and features that are essential for your video conferencing sessions.
Follow these steps to configure the toolbar settings:
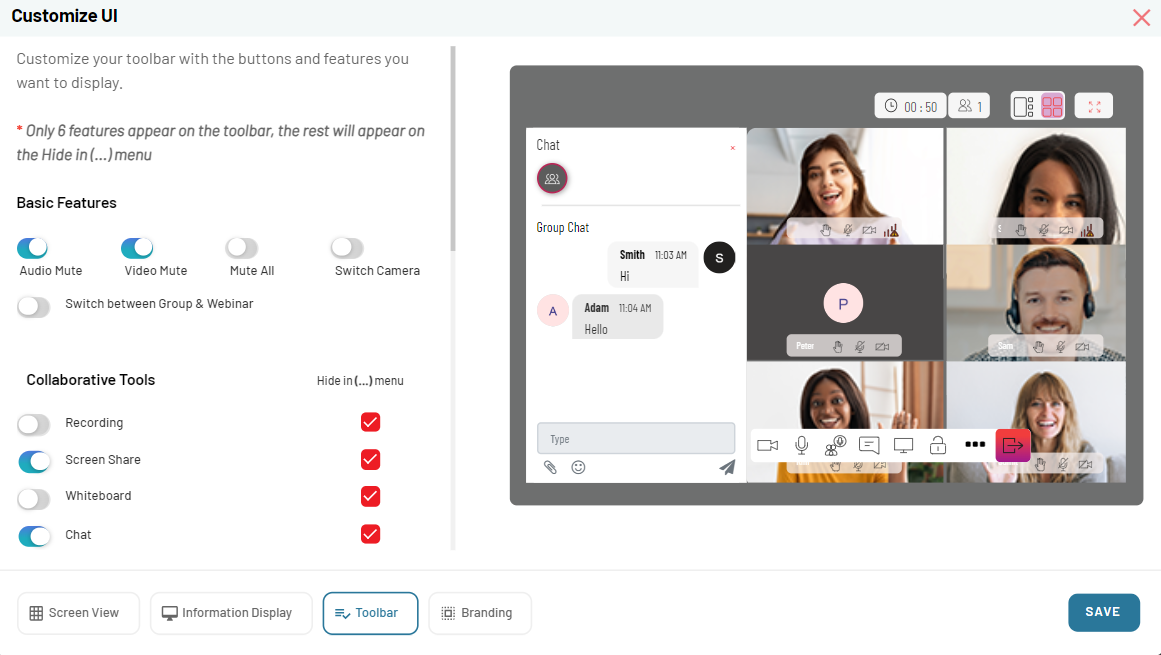
- Navigate and click Toolbar tab.
Note: Only six features can appear on the toolbar, while the rest will be accessible through the Hide in (...) menu.
Basic Tools
-
Choose from a range of Basic Features to have quick control over your audio and video settings. You can choose basic features from the following:
- Audio Mute
- Video Mute
- Mute All
- Switch Camera
Collaborative Tools
-
Explore the Collaborative Tools available and decide whether you want them to be directly visible on the toolbar or accessible through the Hide in (...) menu. You can choose collaborative tools from the following:
- Recording
- Screen sharing
- Chat
- Whiteboard
-
Enable or disable PSTN Voice Integration based on your business requirements.
-
Select your preferred Video Grid View to determine how participant videos are displayed during video calls. You can choose video grid view from the following:
- Gallery
- Leader
- Both (Gallery and Leader)
Moderator Settings
-
These features provide advanced moderation capabilities for managing participant access, facilitating discussions, and maintaining security and privacy. To configure moderator settings, do the following:
- Navigate to the Moderator Settings section.
- Enable or disable additional controls for moderator and decide whether you want them to be directly visible on the toolbar or accessible through the Hide in (...) menu.
You can choose additional moderators control from the following:
- Floor Access Control: Temporary permission to share your audio and/or video (publish your stream) in a video meeting.
- Breakout Room: Create one or many rooms within a meeting where groups of participants can discuss.
- Lock Room: Keep uninvited participants away from a meeting room.
Toolbar Settings
-
Specify the behaviour for the bottom control bar:
- Movable: Users can freely reposition the bottom control bar as needed, offering flexibility in the user interface.
- Fixed: The bottom control bar remains in a fixed position, ensuring consistent access to essential controls.
- Hide after 10 seconds of inactivity: The bottom control bar automatically disappears after 10 seconds of user inactivity, maximizing screen space and minimizing distractions.
-
Once you specified your toolbar settings, click on SAVE button.
Branding Settings
The branding settings allow you to customize the visual appearance and administration settings of your application. You can configure colors, text, and other elements to reflect your branding preferences.
Follow these steps to configure the branding settings:
- Navigate and clic on Branding tab.
Color Tab
- In the Color tab, select colors for different elements of your application.
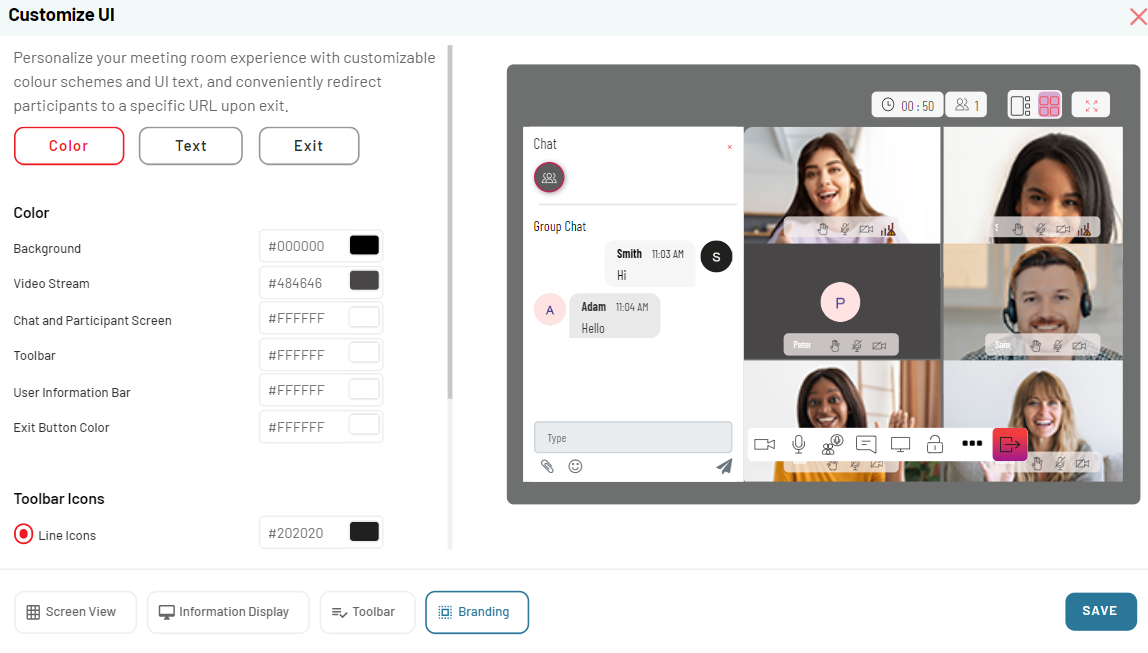
-
Customize the following:
- Background color
- Video stream color
- Chat and participant screen color
- Toolbar color
- User information bar color
- Exit button color
-
Choose between different types of toolbar icons, such as:
- Line icons
- Solid icons
Text Tab
- In the Text Tab, configure font sizes for various text elements, including chat, top bar display and meeting room name.
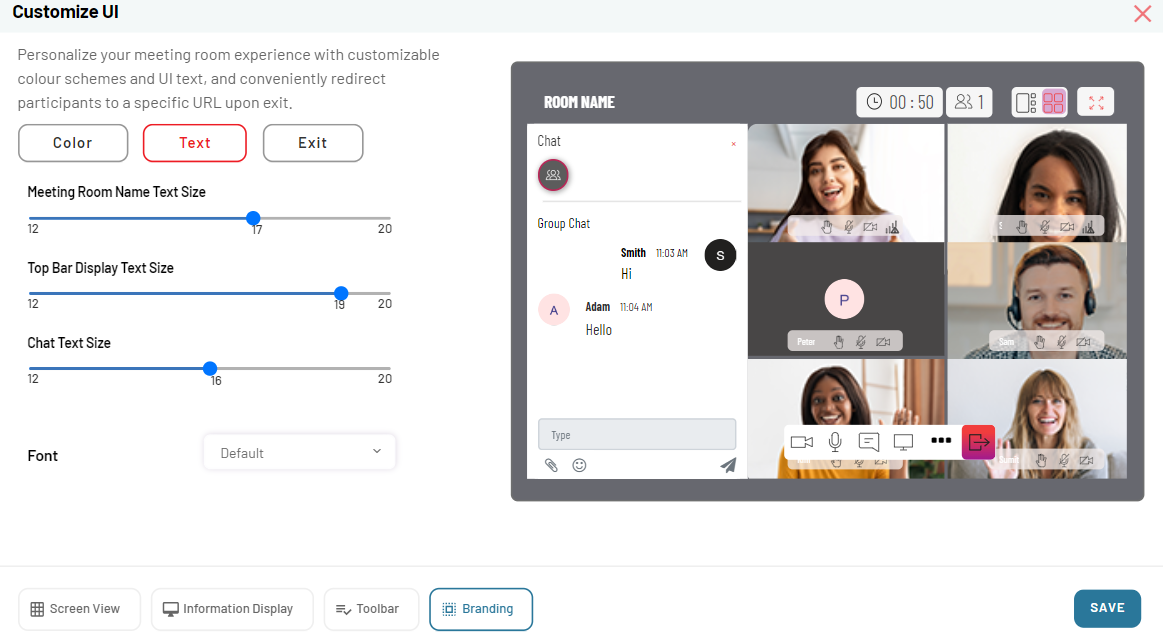
The Text tab alows you to select the font size of the text for:
- Chat
- Top Bar Display
- Meeting Room Name
Exit Tab
Enable or disable the administrator setting here.
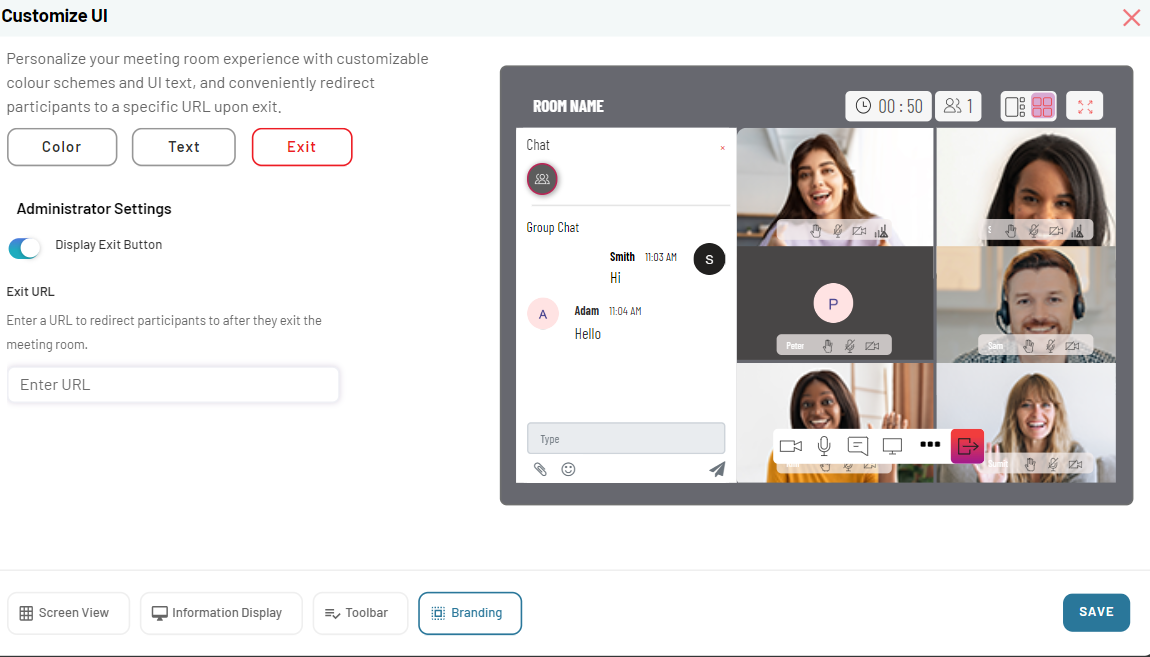
Based on your requirement, you can enable or disable the Administrator setting.
-
Toggle to enable or disable the Display Exit button.
-
In Exit URL, enter the URL that you want participants to receive after they;
- Sign out or exit from the session.
- Disconnect from the session.
Note: Ensure that the URL is prefixed with "https://".
After specifying the branding settings, proceed to configuring the add-on features.