Design your Chatbot's Flow using Bot Flow Builder
This section presents a systematic guide for designing your Chatbot flows with the Bot Flow Builder. We begin with an overview of the primary conversation pathways and error-handling flows. The subsequent sections will provide a step-by-step approach to developing a resilient chatbot that efficiently manages interactions through the strategic use of automated actions.
Overview
The Bot Flow Builder provides a structured view of the various conversation paths a bot can take. This is managed under the Bot Flows section in the right-side pane of the interface.
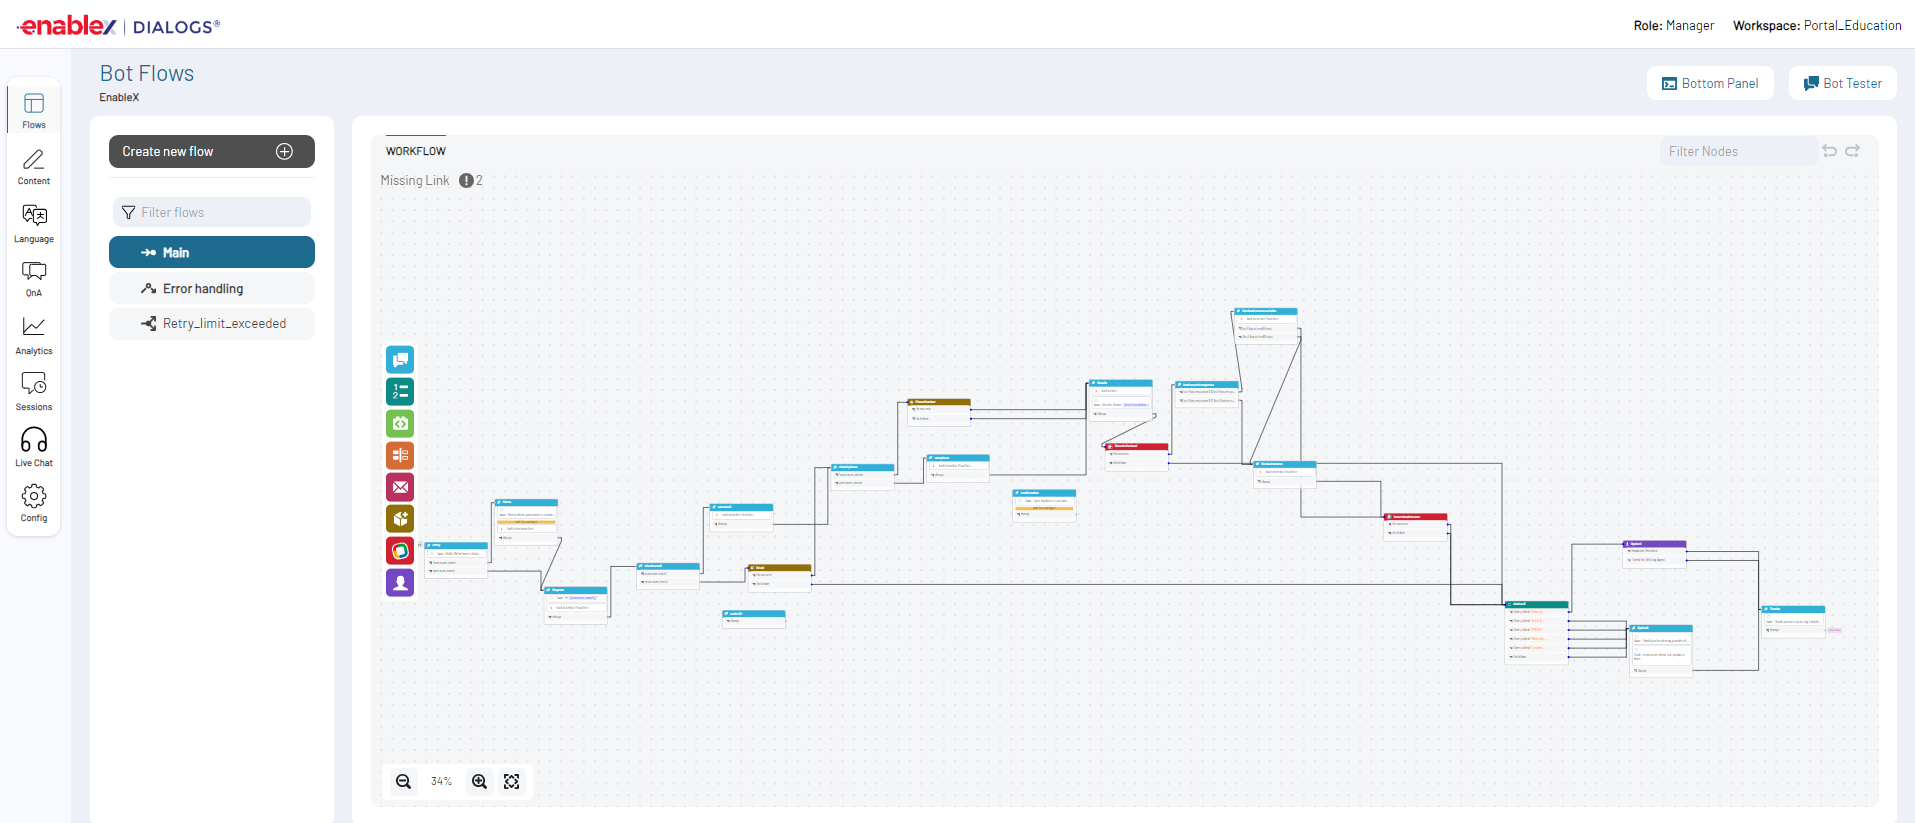
Main Flow
The primary conversation flow that the bot follows during its standard interactions with users. It maps out the usual sequences of messages, prompts, and actions the bot is expected to perform under normal circumstances. This is your bot's primary interaction pathway. Users can create as many main flows as needed.
Error Handling Flow
The Error Handling flow is designed to address unexpected user inputs or system errors. It ensures that the user experience remains seamless, even when unforeseen challenges arise. When an error or unexpected input is detected, the bot will divert to the Error Handling flow to guide the conversation back on track or to handle unexpected events.
Design Chatbot Flow
To create a chatbot flow using Bot Flow Builder, follow these steps:
- Launch the Bot Builder tool and navigate to the Flow Builder section to start designing your chatbot's conversation path.
- The Flow Builder is divided into Main Flow for the primary user interactions and Error Handling for managing exceptions.
- Start with the Start Node to set the initial interaction, such as a greeting or a question.
Note: The Start Node is the foundational element and is already provided on the canvas for initial bot-user interaction.
- Click on the Start Node to open the Inspector pane, where you can program the bot's responses and actions.
- Use Transitions to connect the nodes and guide users through the conversation based on their inputs.
- Add new paths for complex conversations or specific user requests by clicking the Create new flow.
- Test the bot flow repeatedly to ensure smooth interactions and to troubleshoot any potential issues.
- For a more dynamic chatbot, integrate external APIs to enable real-time data retrieval and actions.
- Set up robust Error Handling flows to manage unexpected user inputs or errors effectively.
- Utilize analytics to monitor user interactions and adjust the chatbot flow for improved user experience.
Read: How to Use the Node Inspector in Bot Builder
For alternate chat pathways to cater to specific scenarios or special cases, do the following:
- Navigate and click on Create new flow.
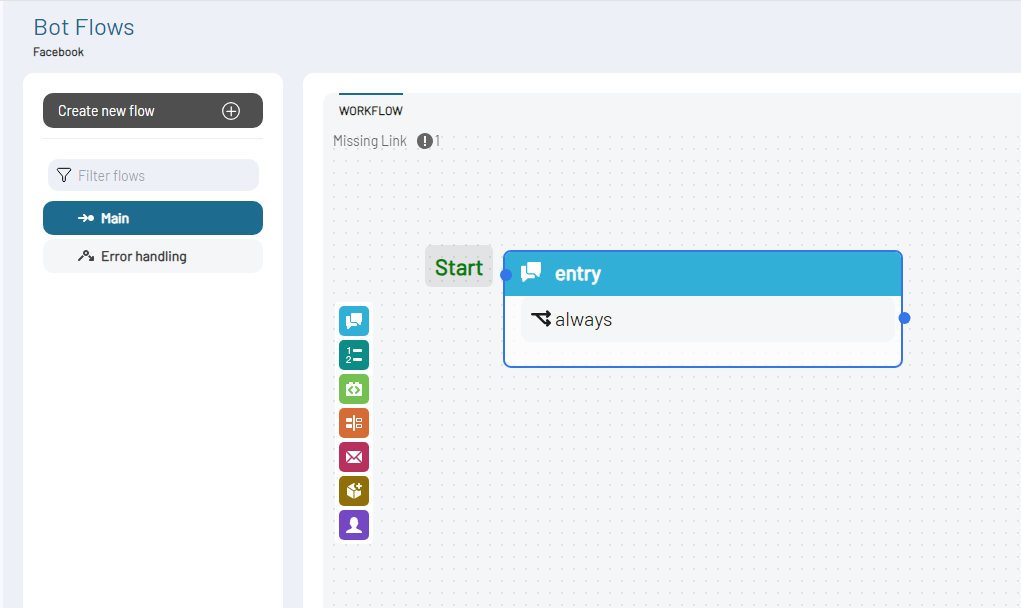
- This action will open a **Create Flow **window.
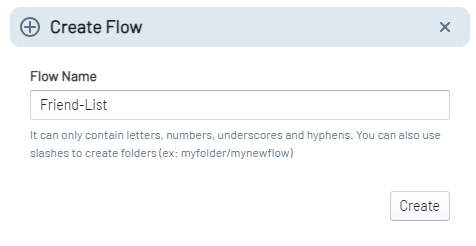
- In the window, provide the name of the new interaction sequence or flow.
- Click on Create button.
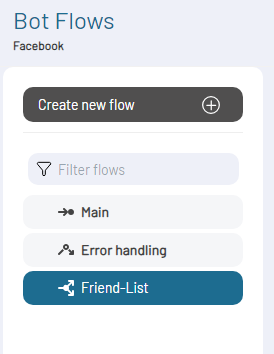
- The newly created flow will be listed in the Bot Flow menu.
Automated Actions
You can make your bot smarter by using automated actions. These options are listed on the left side of the bot canvas. With these, you can have the bot ask for specific details from the user, collect data, offer multiple choices, handle errors, call API, send emails, CRM and google spreadsheet integration or even hand over the chat to a human when needed.
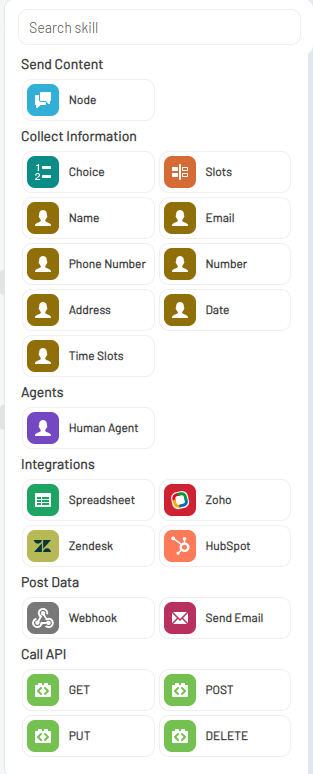
Create a Node
Nodes are the basic building blocks that make up the conversational logic of your chatbot. A conversation is always anchored at one active node at any given time. Nodes manage the flow of a conversation, guiding it from one point to the next until a logical endpoint is reached. Nodes have three distinct stages in their lifecycle: onEnter, onReceive, and onNext.
Node Lifecycle:
- On Enter: These are the actions executed as soon as a node is entered. Actions could range from sending a message to making an API call.
- On Receive: These are the actions executed when the node receives a message from the user. This makes the node wait for user input.
- Transitions: Defines what the next steps are once the onReceive actions are complete. This usually involves transitioning to another node or ending the conversation.
To add a node in your bot flow:
- Access the desired bot's Bot Flow Builder.
- Drag the Node icon from the options on the left side onto the canvas from the Automated Actions list, or right-click on the canvas and select Standard Node.
- A node will appear on the canvas.
- Click the Node. Node Inspector will open.
- In the Node Inspector pane, fill in the required details for OnEnter, OnReceive, and Transitions properties.
Read: How to Use the Node Inspector in Bot Builder
Create Choices
Choice is a predefined set of options presented to the user, allowing them to select one or sometimes multiple option to guide the conversation. To add a choice in your bot workflow, do the following:
- Access the desired bot's Bot Flow Builder.
- Either drag the Choice option onto the canvas from the Automated Actions list, or right-click within the canvas, choose Add Node > Action, and then select Choice.
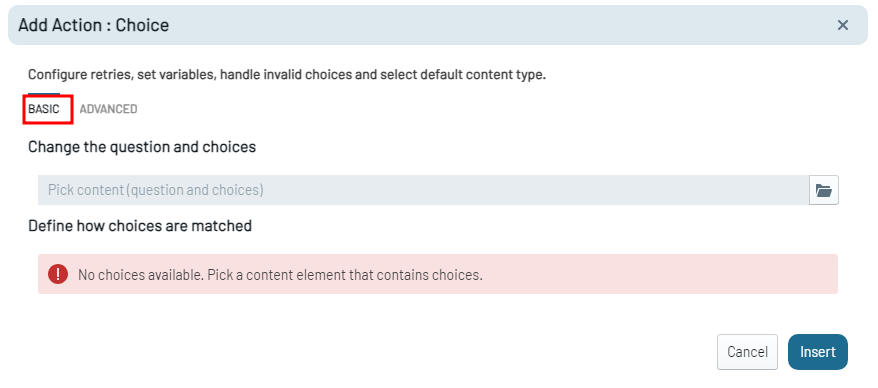
- This will open an Add Action: Choice form.
Basic Choice Setting
The Basic Settings enable you to set up the core components of a choice action, such as editing the question and options presented to the user, and defining how the bot matches user responses to these choices. In the Basic Settings for a Single Choice action:
Change the question and choices
This is the interactive element of your bot that the users will engage with. In the case of a Single Choice, this will be the one option user can select.
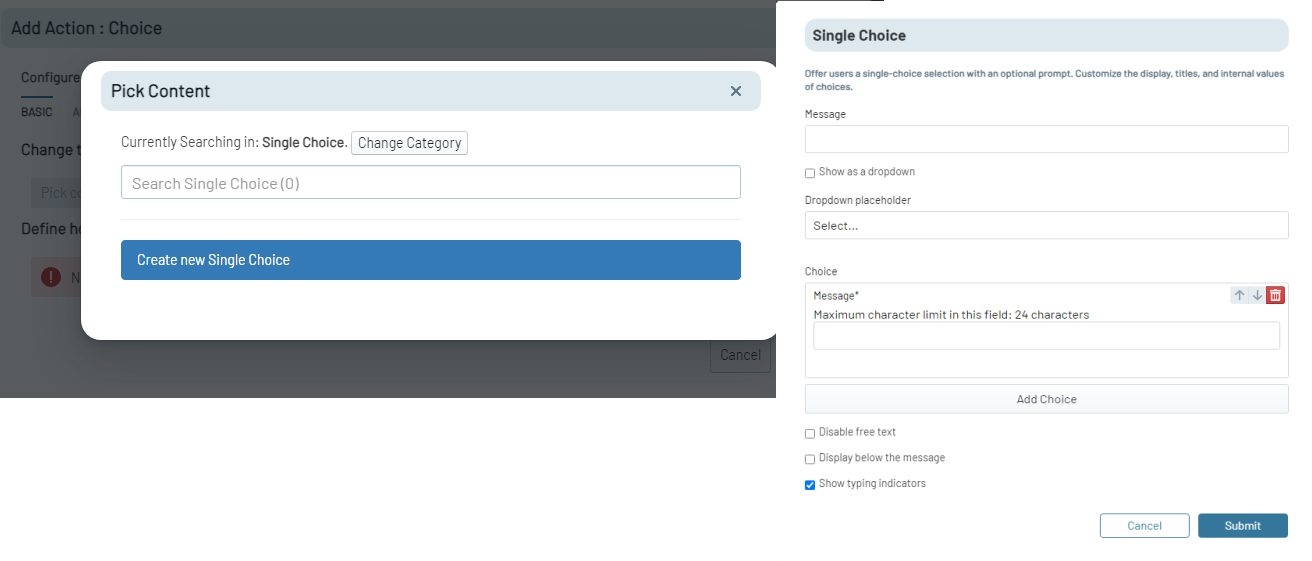
- Access the Single Choice form within the Change the question and choices field.
- Write a prompt in the Message field to guide the user's interaction.
- Provide a Placeholder text which will display as guidance within the choice input field before a selection is made.
- List the available options for the user to choose from.
Define How Choices are Matched
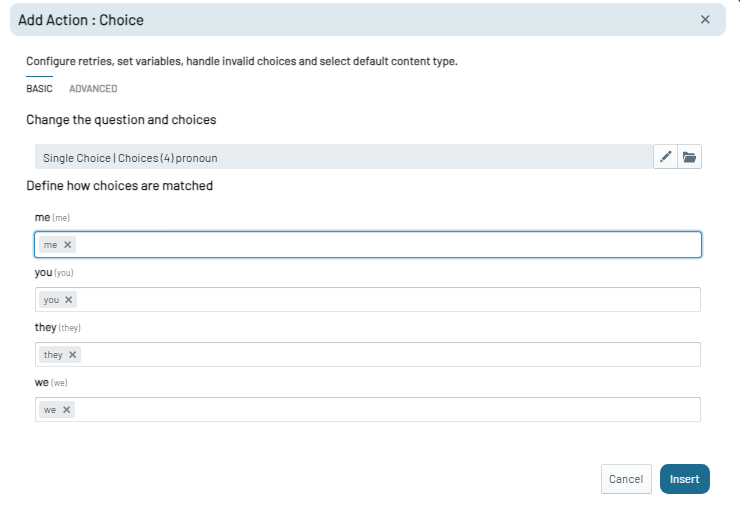
- After defining the available choices, configure the response matching settings.
- This allows you to establish how the bot will interpret and match the user's input to the provided choices.
- Define matching keywords for each choice to facilitate accurate matching of user responses.
Advanced Choice Setting
The advanced settings give you more control over how the bot interacts with the user when they are presented with a set of choices. It lets you set up a structured and user-friendly way to handle incorrect inputs and guide the user back to the intended flow of the conversation.
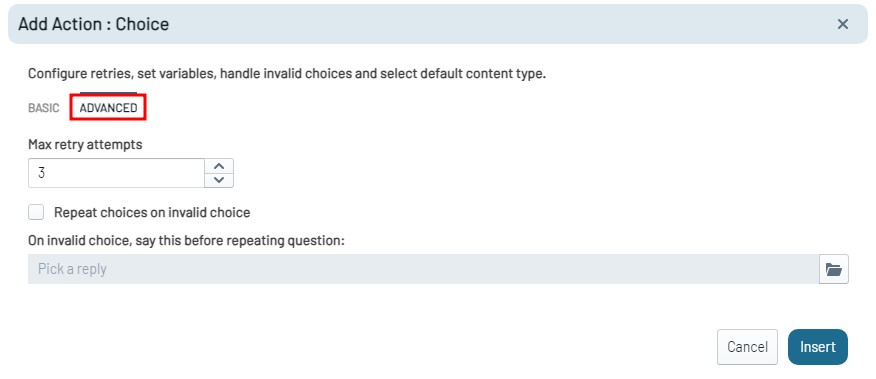
Set maximum retries
- Define how many times the bot will re-prompt if the user gives an invalid choice.
Handle invalid choices
-
Decide how the bot will respond if the user does not pick any presented options or goes off-track.
Enable Repeat choices on Invalid choice
- Activate this to present the choices again after an invalid input.
Fallback Response for Invalid Choices
- Input a custom message to inform the user of their incorrect selection before presenting the choices again.
-
Once you have done with all the Basic and Advanced settings, click on Insert button to finalize your Choice Node.
-
The choice node is now ready for additional transition configurations.
Configure bot to Call APIs
Integrate your chatbot with external services using the Call API action to fetch or send real-time data, facilitate dynamic interactions, and enhance functionality. To use the Call API action, do the following:
- Access the desired bot's Bot Flow Builder.
- Either drag the Call API option onto the canvas from the Automated Actions list on the left side, or right-click within the canvas, choose Add Node > Action, and then select Call API.
- This will open an Add Action: Call API form.
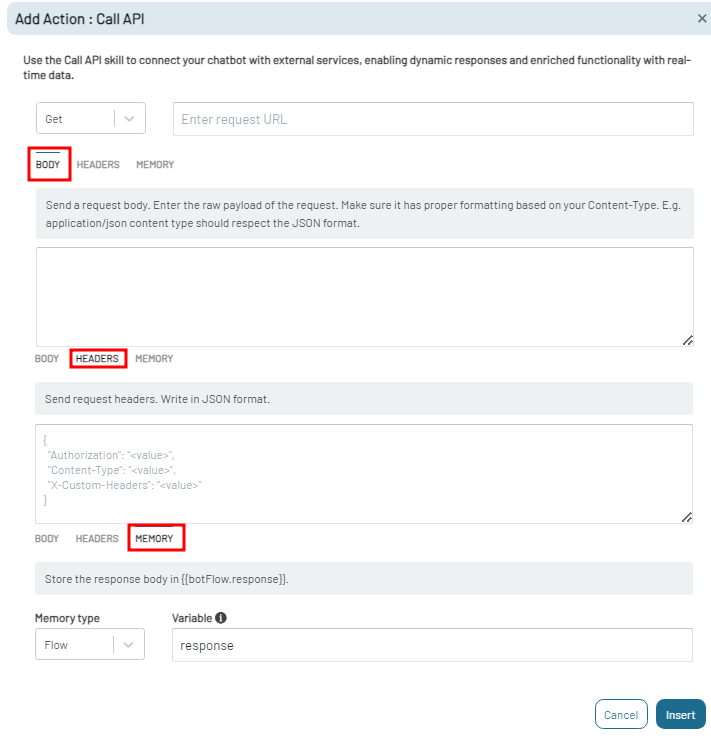
To configure the API Call, do the following:
Choose Request Type
- Select the HTTP method [GET, POST, PUT, DELETE] appropriate for your task.
Enter Request URL
- Provide the endpoint URL for the API call.
Body
- Input the raw payload for methods like POST and PUT.
Headers
These are meta-data fields that define the properties of the API call. Headers can include authorization tokens for secure access, content-type to specify the data format, and custom headers for any specific needs of the API.
- Add request header details such as Authorization tokens and Content-Type. Note: The Request headers in JSON format is allowed.
Memory
The Memory feature allows users to define where and how the bot stores the data received from the API call. This stored data can be accessed in later interactions, enabling more dynamic and context-aware conversations. Users can choose from these types, which include Flow and Session dictate the scope and lifespan of the stored data.
Variable: This is the specific name of the variable where the API response body will be stored. You can later refer to this variable to access stored data in other parts of the bot.
-
Select MEMORY tab and define the Memory Type where to store the API responses (Flow or Session).
-
Flow: This type of storage is used to hold data that is only relevant for a single conversation flow. It is temporary and the data is typically lost once the conversation ends.
-
Session: Session-level storage, slightly longer-lasting but still temporary. Session storage is usually cleared after a certain period of inactivity or when the session is explicitly ended.
-
-
Specify the Variable name to store the API response data for later use.
Note: By default, the API response is stored in {{botFlow.response}}.
- Review your settings and click on Insert to add the Call API action to your chatbot workflow.
Configure Slot Filling
Slot filling is a powerful technique in chatbot development, allowing the bot to collect multiple pieces of information (or slots) from a user within a single interaction. To Fill a slot, do the following:
- Access the desired bot's Bot Flow Builder.
- Either drag the **Slots ** option onto the canvas from the Automated Actions list, or right-click within the canvas, choose Add Node > Action, and then select Slots.
- This will open an Add Action: Slots form.
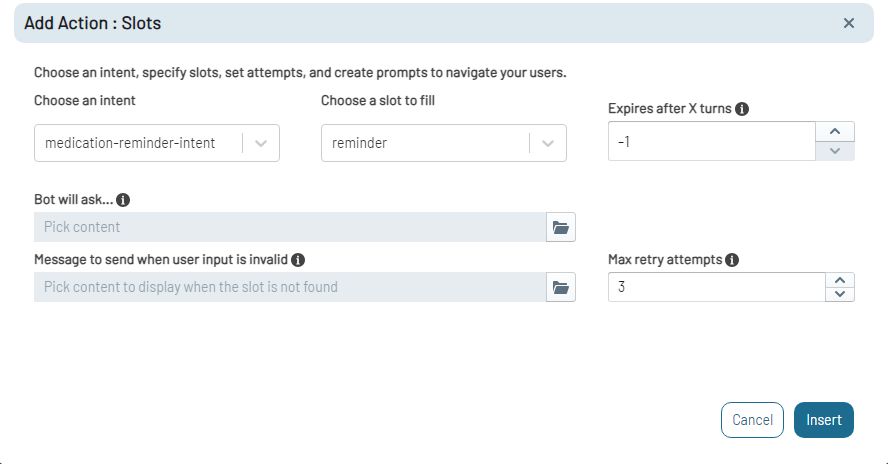
- Select the desired intent from the pre-defined intents in the NLU settings.
Note: Intents need to be pre-configured in the NLU settings to appear in the dropdown menu.
To know more about how to create Intents, please read Creating an Intent.
- Select the appropriate slot associated with the chosen intent.
Note: Slots should already be created for the intent and will be available for selection in the dropdown.
To know more about how to create slots for Intents, please read Creating a Slot.
Expiration Turn Count
- Set a number of interactions turns after which the slot information expires, or set it to -1 for indefinite validity.
Bot Prompt
- Write a clear and concise prompt that guides users to provide the necessary information for the slot.
Invalid Input Message
- Define a message for instances where the user input does not match the slot's expected value or format.
Max Retry Attempts
- Set the number of times the bot will ask for the valid slot information after receiving invalid inputs.
- Click the Insert button to create and add the Slots node to your bot's flow.
Handling Transitions in Slots Node
On Extracted
This transition occurs when the bot successfully extracts required information from the user's input.
- Return to Previous Node: Send the user back to the Slots fill node to collect more input.
- Transition to Node: Transition to the next node in the flow that utilizes the extracted information
On Not Found
This transition is used when the bot cannot extract the required information from the user's input.
- Transition to Node: Inform the user that the symptom details were not understood or captured and Reprompt the user for the correct details.
- Return to Previous Node: Offer the user the option to re-enter their input details or choose from a predefined list of options.
On Already Extracted
This transition handles cases where the information provided by the user has already been gathered earlier in the conversation.
- Transition to Node: Notify the user that the information is already collected to prevent redundancy and Reprompt user to provide other that this input.
- Transition to Subflow: Based on the bot's design, either continue collecting more inputs or move to a different part of the assessment flow.
Configure Collect User Data
The Data Type action in a bot helps capture and validate user input. It ensures the information provided by users conforms to a specific format, be it an email, a number, or name. By employing this skill, you prevent potential errors or misunderstandings that could arise from incorrect or unintended input.
Implement the Data Type action when:
- Collecting personal user details like name, phone number, email addresses, date or time slots.
- You need user input to match a specific format or criterion.
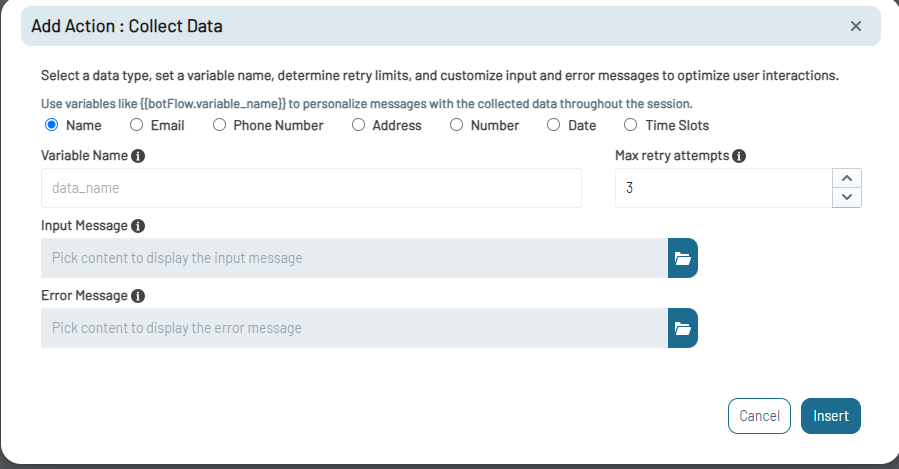
To configure collect data functionality to your Bot:
- Access the desired bot's Bot Flow Builder.
- Either drag the Collect Data option onto the canvas from the Automated Actions list, or right-click within the canvas, choose Add Node> Action, and then select Collect Data.
- This will open an Add Action: Collect Data form. Data Type Selection
- Choose the type of data you want to collect (Name, Email, Phone Number, Address, Number, Date or Time Slots).
Variable Name
- Assign a unique variable name for the collected data.
- Ensure the uniqueness of the variable name within the bot's flow to avoid any overlaps or data mishaps.
**Set Maximum Retry **
- Define the maximum number of times the bot should retry collecting data before proceeding or providing an error message.
Input and Error Messages
- Input Message: Write a prompt for the bot to request the user's information.
- Error Message: Write a message to notify the user when their input does not conform to the expected data type.
- Click on Insert button to save the configuration and add the Collect Data Action to the bot's flow.
- The Collect Data Node is now ready for additional transition configurations.
Configure Time Slots for Appointments or Events
To gather time slot information from users, follow these steps:
- select the Time Slots data type.
- This action will open fields for entering dates and specific time slots.
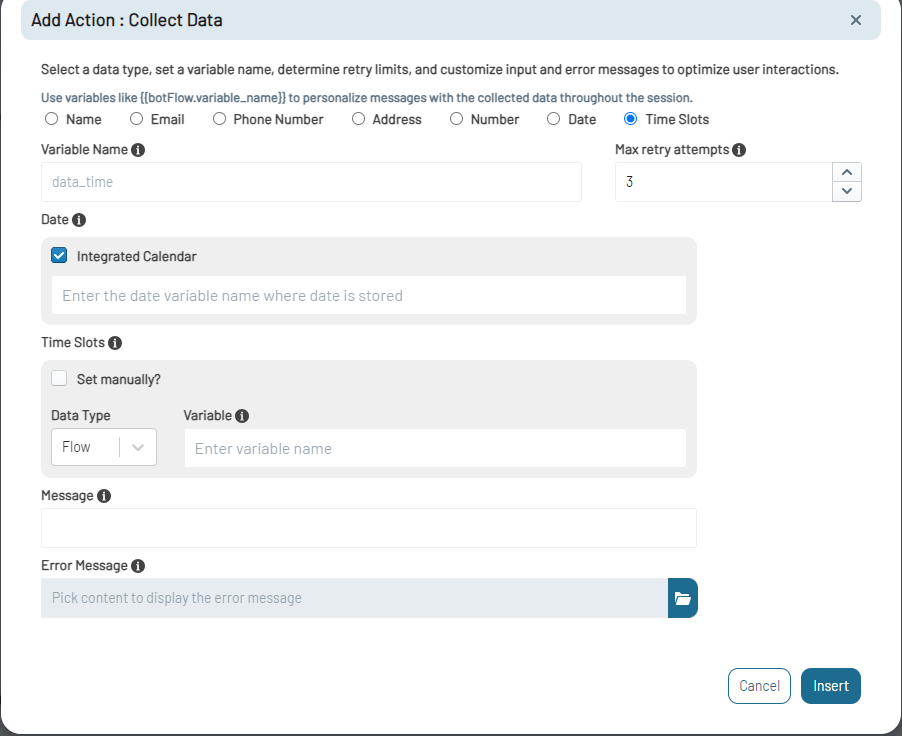
- Enter a unique variable name where the time slot data will be stored for use within your bot's workflow.
- Check Integrated Calendar to enable a calendar interface, allowing users to easily select dates.
- Enter the variable name in which the selected date will be stored. This variable will hold the date data for use in your bot's workflow.
- Configure time slots either by API Integration or manually to provide specific appointment or event options to your users.
- If not setting manually, configure your bot to automatically fetch available time slots from your backend systems via APIs.
- Select the data type and enter the variable when using API. The expected variable object format is:
- Check Manual Setting checkbox and click Configure slot manually tab.
- This action will open Configure time slots for week interface. This interface enables you to specify time slots for different days of the week.
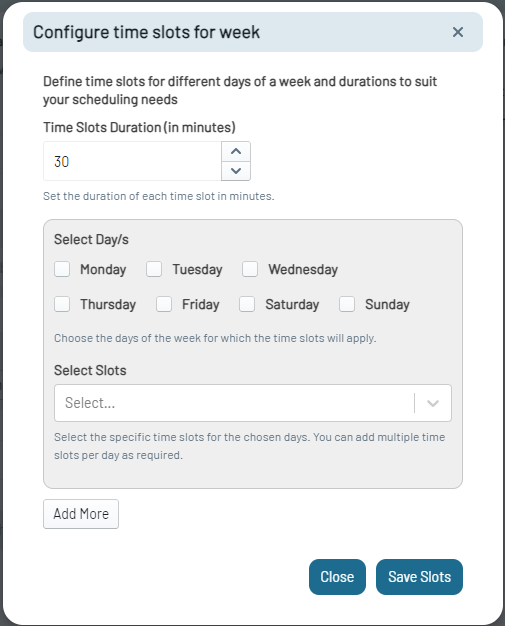
Manual Setting
-
Open the **Configure time slots for week **interface.
-
Set Duration: Choose from the dropdown.
-
Select Days: Apply time slots to multiple days.
-
Add Time Slots: For each selected day, add multiple slots.
-
Add More: Define additional sets of time slots.
-
Save Slots: Apply the settings.
-
Insert Collect Data Node: Add to bot's workflow for further configuration.
The Collect Data Node is now ready for additional transition configurations.
Configure Automate Email Sending
The Send Email Action enables automated email communications as part of the chatbot's flow. It serves various scenarios, such as issuing transactional emails, notifications, or alerts, depending on the user's engagement with the chatbot. Similarly, you could configure the bot to send alert emails to administrators based on certain trigger conditions.
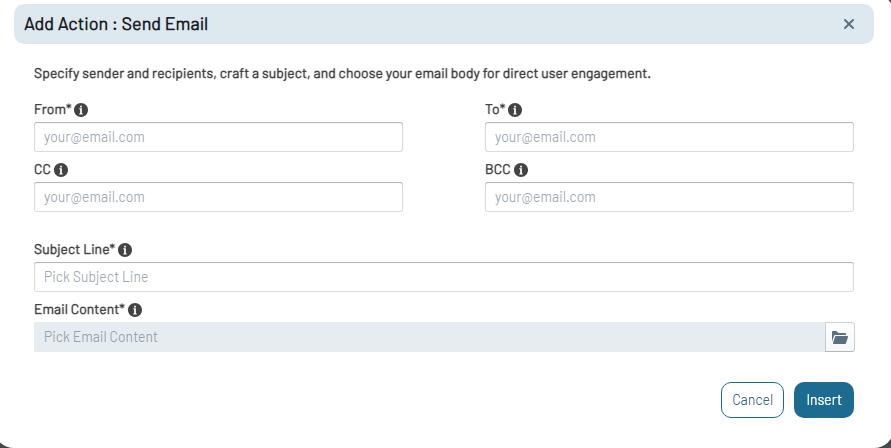
To configure Send Email functionality to your Bot:
- Access the desired bot's Bot Flow Builder.
- Drag the Send Email option onto the canvas from the Automated Actions list or Right-Click within the canvas, choose Add Node > Action, and then select Send Email.
- This will open an Add Action: Send Email form.
From
- Enter the sender's email address (your organization's support or transactional email).
To
- Enter the primary recipient's email address. This can be hardcoded or dynamically set from user inputs or variables.
CC
- Optionally, add carbon copy recipients if needed, separated by commas for multiple emails.
BCC
- Optionally, add blind carbon copy recipients for private visibility, separated by commas for multiple emails.
Subject Line
- Write the subject line of the email, which could be a predefined static subject or one dynamically generated from the bot's conversation.
Email Content
- Choose or write the main content/body of the email, which can also be either static or dynamic.
- Click on Insert button to save the configuration and add the Send Email Action to the bot's workflow.
- The Send Email Node is now ready for additional transition configurations.
Integrate GoTo Agent Capability
The GoTo Agent capability is useful for seamless handover from automated bot conversations to human agents. It serves as a powerful tool for engaging users autonomously while allowing for manual or programmatic interruption where human expertise is required. The skill also enables a timeout feature, allowing you to specify how long a user should wait for an agent before the request is aborted or redirected.
Below are a few examples of when can a user add Human assistance to their bot flow.
Unresolved Queries: For queries or use cases that are complex or not yet fully supported by the bot. Manual Oversight: To pause a user's conversation programmatically or manually and alert agents when intervention is needed. Agent Interface: Agents can monitor paused conversations and continue the dialogue via agent login.
To add Human Assistance skill in your Bot flow:
- Access the desired bot's Bot Flow Builder.
- Drag the Go To Agent option onto the canvas from the Automated Actions list or Right-Click within the canvas, choose Add Node > Action, and then select Go To Agent.
- This will open an Add Action: Goto Agent form.
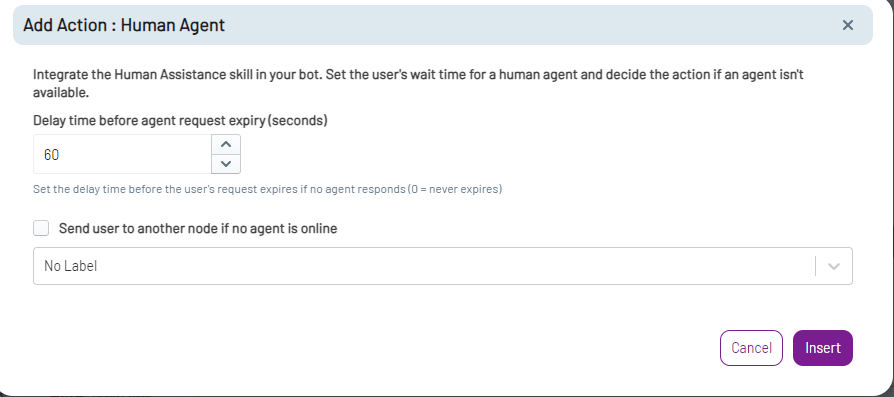
Set Delay
- Enter the duration in seconds that a user should wait for a human agent's response. If this is set to 0, the request will not time out.
Optional Redirection
- Check the option Send user to another node if no agent is online if you want the user to be redirected to a different part of the workflow when no agent is available within the specified timeout period.
- Click on Insert to save the human assistance configuration.
- The Go To Agent Node is now ready for further transition.
Handling Transition in Goto Agent Node
The Goto Agent Node provides three primary types of transition conditions:
- Handover Resolved
- No Agent Available
- Timed Out Waiting for Agent
Each of these transition conditions can be programmed to steer the chatbot-user interaction in various directions. Here are the options you have under each:
Handover Resolved
If an agent successfully resolves a handover, the following options can be used:
- End Flow: Terminate the current conversation after the agent resolves the issue.
- Return to Previous Flow: Send the user back to the point in the conversation flow where the Goto Agent was triggered.
- Transition to Node: Move the conversation to a specific node designed for post-resolution activities.
- Transition to Subflow: Switch to an entirely different conversational sub flow.
No Agent Available
If there is no agent available to handle the handover, the following actions can be taken:
- End Flow: End the conversation with an automated message indicating no agents are available.
- Return to Previous Flow: Send the user back to the point in the conversation flow where the human assistance was triggered.
- Transition to Node: Move to a specific node that can guide the user on what to do next.
- Transition to Subflow: Redirect the user to another subflow, which might offer self-help options or FAQs.
Timed Out Waiting for Agent
If the user times out while waiting for an agent, the following actions can be taken:
- End Flow: End the conversation with an automated message apologizing for the inconvenience.
- Return to Previous Flow: Send the user back to the point in the conversation flow where the human assistance was triggered.
- Transition to Node: Transition to a specific node that informs the user about the timeout and presents next steps.
- Transition to Subflow: Send the user into a subflow designed for timeout scenarios, which could offer callback options or other resources.
Configure Webhook Integration for Your Bot
The Webhook Action enables chatbot real time data exchange with external services. To configure a webhook in your chatbot flow for connecting with external services, follow these steps:
- Open your desired bot's workflow.
- Either drag the Webhook option onto the canvas from the Automated Actions list on the left side, or right-click within the canvas, choose Add > Action, and then select Webhook.
- This will open an Add Action: Webhook form.
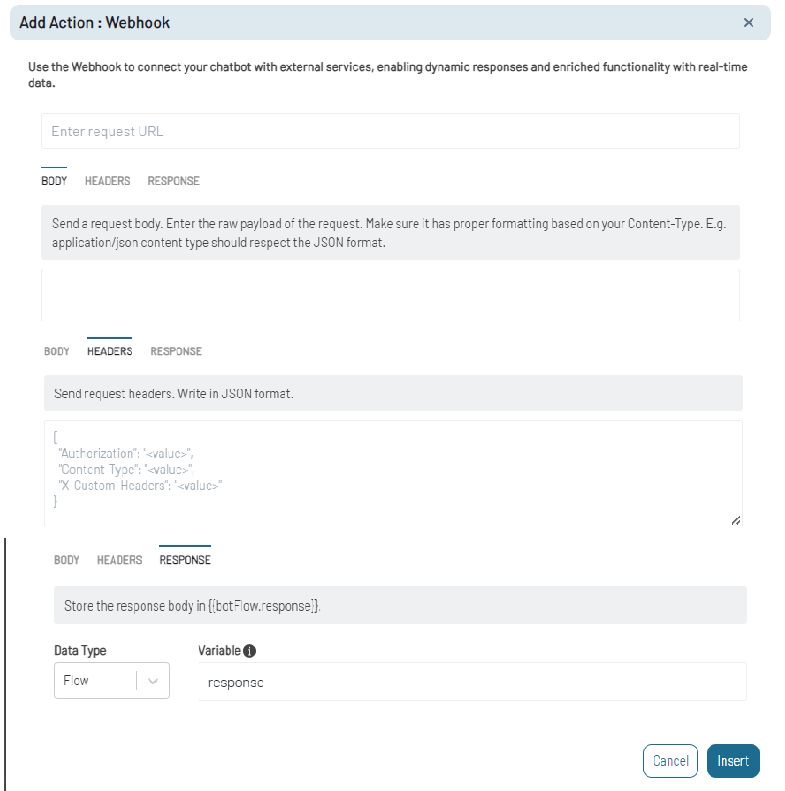
Webhook URL
- Enter the endpoint URL where the webhook should send the request.
Body
- Input the raw payload of your request. Ensure it is correctly formatted according to the expected content type, like application/json.
Headers
- Enter necessary request headers such as Content-Type and Authorization for secure API calls.
Note: The Request headers in JSON format is allowed.
Response
-
Memory Type: Decide where the response data should be stored for later use within the bot's conversation flow. This stored data can be accessed in later interactions. Users can choose from these types, which include Flow and Session dictate the scope and lifespan of the stored data.
- Flow Memory: Temporary storage only available during the current conversation flow.
- Session Memory: Data persists across the bot session but resets after the session ends.
-
Variable: Specify a variable name to store the response data. This variable can be used later in the workflow to make decisions or trigger other actions.
-
Review all configurations and insert the webhook action into your workflow. This action will now trigger whenever the bot reaches this point in the conversation.
-
Select MEMORY tab and define the Memory Type where to store the responses (Flow or Session).
- Flow: This type of storage is used to hold data that is only relevant for a single conversation flow. It is temporary and the data is typically lost once the conversation ends.
- Session: Session-level storage, slightly longer-lasting but still temporary. Session storage is usually cleared after a certain period of inactivity or when the session is explicitly ended.
-
Specify the Variable name to store the response data for later use.
Note: By default, the response is stored in
{{botFlow.response}}.
- Review your settings and click on Insert to add the Webhook action to your chatbot workflow.
Configure your Bot to push data in spreadsheet
The Spreadsheet Action allows to push data collected by a bot straight to an external spreadsheet. When configuring actions in your bot flow that involve data collection, such as filling out forms or responding to queries, link these actions to the appropriate spreadsheet columns. For each action where data is collected, specify which column should store the data.
Initial Setup: Configure Column Attributes

Access General Settings
- Start by configuring column attributes under the Bot Configuration's General Settings.
Manage Default Columns
- By default, columns such as Name, Phone, and Email are preset. You can customize this by adding or removing columns to suit your data requirements.
- Once you add all required column attributes, save these changes.
Integrating Spreadsheet in Bot Workflow To configure a spreadsheet in your chatbot flow for pushing the bot's collected data, follow these steps:
- Open your desired bot's workflow.
- Either drag the Spreadsheet option onto the canvas from the Automated Actions list on the left side, or right-click within the canvas, choose Add > Action, and then select Spreadsheet.
- This will open an Add Action: Spreadsheet Data form.
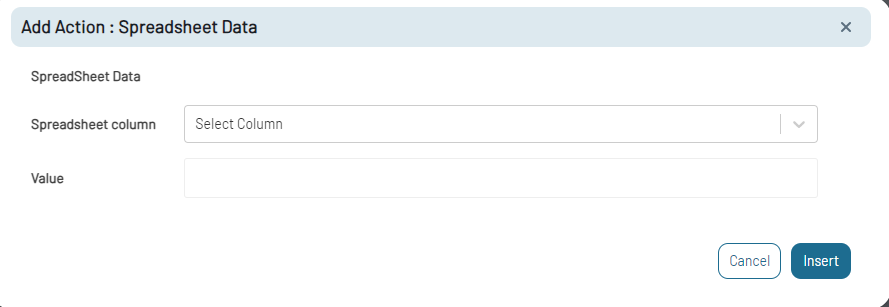
Spreadsheet Column
- Select the spreadsheet column attribute for data storage from the dropdown. This menu displays all column attributes defined in the General Settings.
Value
- Enter the data to be stored in the selected spreadsheet column. This could be a static value, or dynamically fetched from the conversation using tokens (e.g.,
{{ event.payload.name }}for the user's name). - Review all the details and click Insert to add the spreadsheet action to your chatbot workflow.
Configure your Bot to Integrate with Knowledge-Based AI Agents
This is a request-based service. To get this enabled in your flow builder's action section, you need to contact EnableX support at support@enablex.io.
When integrating a knowledge-based AI agent into your chatbot, the process begins with uploading a comprehensive knowledge base. This knowledge base contains detailed information on a variety of topics relevant to your business or service. Once uploaded, the AI agent utilizes this repository to respond to user inquiries. Please read AI Agent Knowledge Base.
As users interact with the chatbot, posing questions or requesting information, the AI agent queries this knowledge base. It employs natural language processing (NLP) techniques to understand the intent and context of each inquiry. Based on this understanding, it retrieves the most relevant information from the knowledge base to provide accurate and helpful responses.
Once Knowledge Base AI Agent service enabled, an AI Agent action option will be appeared onto your Bot builder canvas. To use AI Agent actions, follow these steps:
- Open your desired bot's workflow.
- Either drag the AI Agent option onto the canvas from the Automated Actions list on the left side, or right-click within the canvas, choose Add > Action, and then select AI Agent.
- This will open an Add Action: AI Agent form.

- Select the knowledge base and click Insert to add the AI Agent action to your chatbot workflow.
Note: Knowledge base can be uploaded in the AI Agent Knowledge base under Configuration section. Please read AI Agent Knowledge Base.
Integrate Zoho CRM
Integrating your chatbot with Zoho CRM allows you to perform actions such as creating, updating, searching, and deleting records within your CRM directly through your bot. This allow your bot to interact with customer data in real time.
To get the CRM Action options onto your Bot builder canvas, first you must configure CRM Integration settings in the configuration section of the bot. This step ensures your chatbot has the necessary permissions and connectivity to interact with Zoho CRM services. Please read CRM Integration Settings.
To use Zoho CRM actions, follow these steps:
- Access the desired bot's Bot Flow Builder.
- Either drag the ZOHO CRM option onto the canvas from the Automated Actions list on the left side, or right-click within the canvas, choose Add Node > Action, and then select ZOHO.
- This will open an Add Action: ZOHO form.
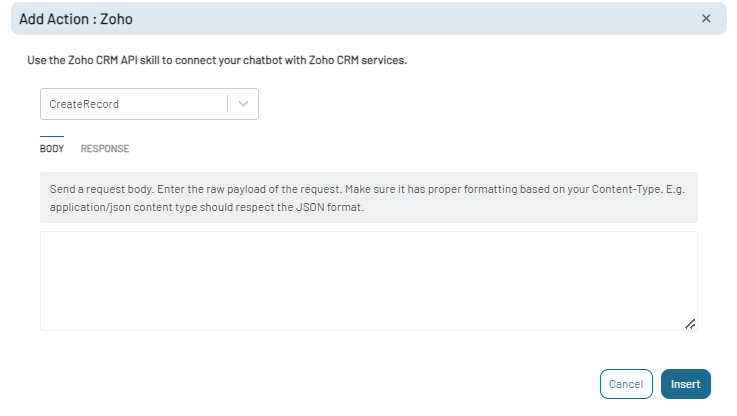
Select the Action
From the drop-down menu, select the action you wish to perform with Zoho CRM. The options include Create Record, Search Record, Upsert Record, and Delete Record.
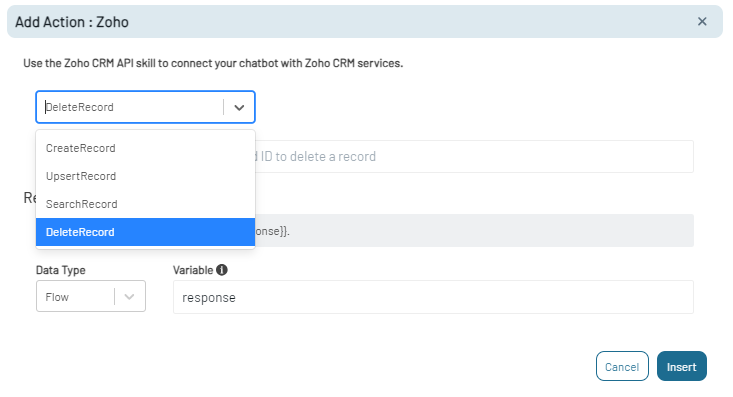
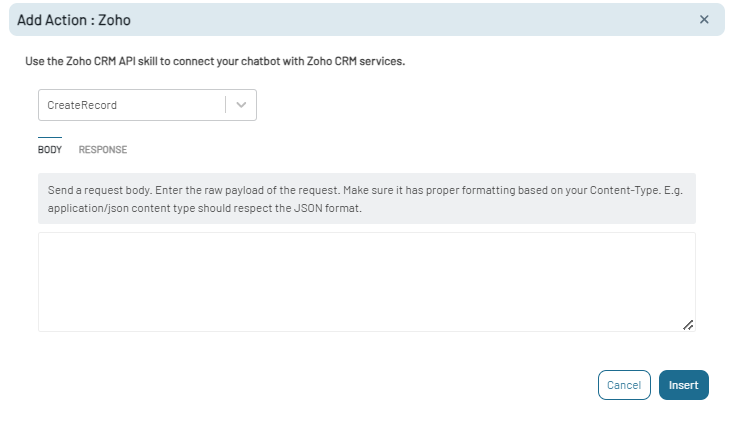
- CreateRecord: To add a new entry to your CRM.
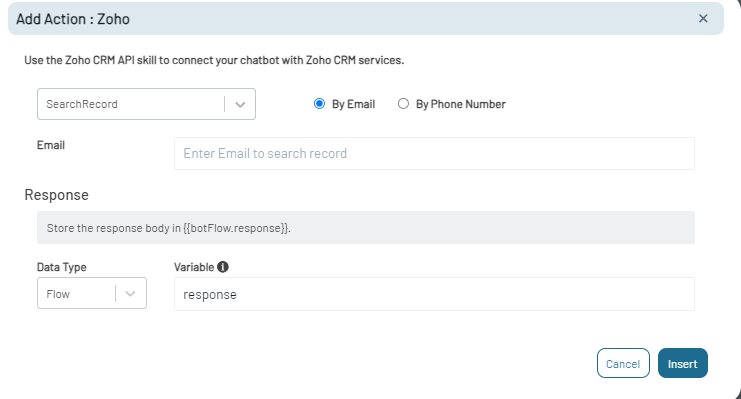
- SearchRecord: To find existing records using parameters like email or phone number.
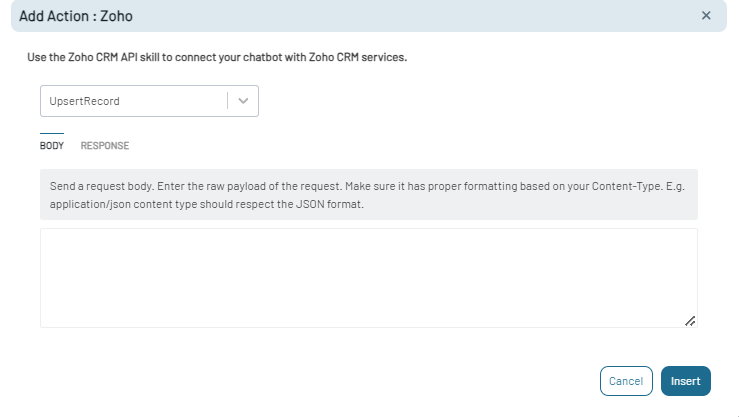
- UpsertRecord: To update an existing record or insert a new one if it doesn't exist.
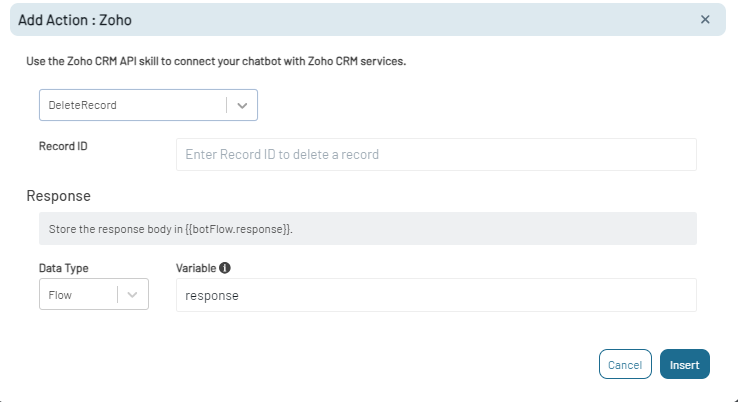
- DeleteRecord: To remove an existing record from your CRM.
Specify Action Details
Depending on the action selected, provide the necessary details.
- For CreateRecord and UpsertRecord, provide the JSON payload that contains the data for the CRM record.
- For SearchRecord, enter the email or phone number to locate the CRM record.
- For DeleteRecord, enter the Record ID of the entry you want to remove.
Set the Response
- In the Response field, choose how the bot should store the response from Zoho CRM. You can make your bot save the response to a variable for later use in the bot’s conversation flow.
Define Data Storage
-
In the Data Type field, select where you wish to store the API responses (Flow or Session).
-
Flow: Use this to store data relevant only for the current interaction flow. It's temporary and resets after the conversation ends.
-
Session: Use this for data that should persist across the entire session, which lasts until a period of inactivity or the session is explicitly closed.
-
Specify the Variable Name
- Provide a name for the variable where the API response will be stored. The default variable is typically formatted as
{{botFlow.response}}. - Once you have configured the details, click Insert to add the Zoho CRM action to your chatbot workflow.
Integrate with Zendesk
By integrating your chatbot with Zendesk, you can improve your bot's capabilities to include actions such as creating, updating, searching, and deleting tickets directly through your bot. This allows your bot to interact with customer data in real time.
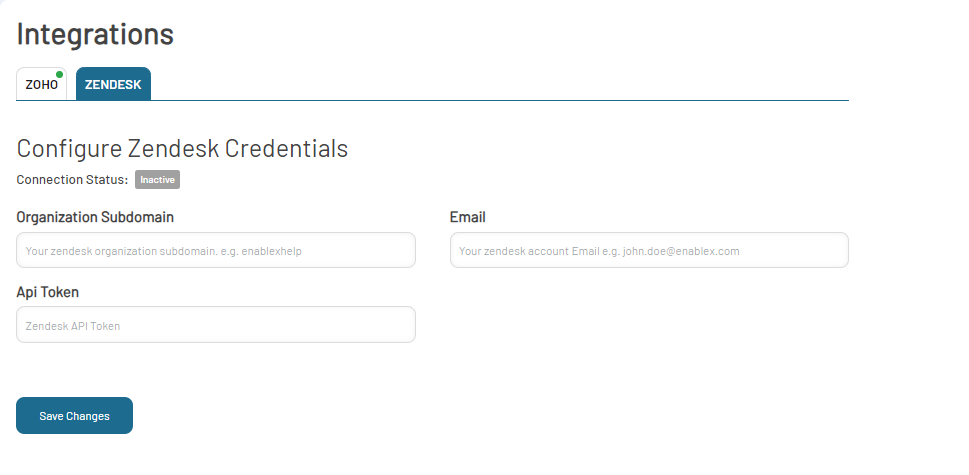
To access Zendesk action options on your Bot builder canvas, you must first configure the Zendesk CRM Integration settings within the Configuration section your bot. This step ensures your chatbot has the necessary permissions and connectivity to interact with Zendesk CRM services. Please read CRM Integration Settings.
Follow these steps to use Zendesk actions within your bot:
- Access the desired bot's Bot Flow Builder.
- Either drag the Zendesk CRM option onto the canvas from the Automated Actions list on the left side, or right-click within the canvas, choose Add Node > Action, and then select Zendesk.
- This will open an Add Action: Zendesk form.
Select the Action
From the drop-down menu, select the action you wish to perform with Zendesk CRM. The options include Create Ticket, Search Ticket, Update Ticket, and Delete Ticket.
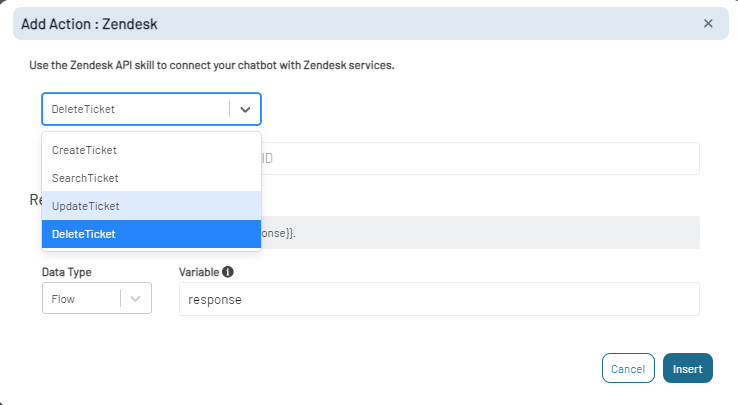
- CreateTicket: To create a new support ticket.
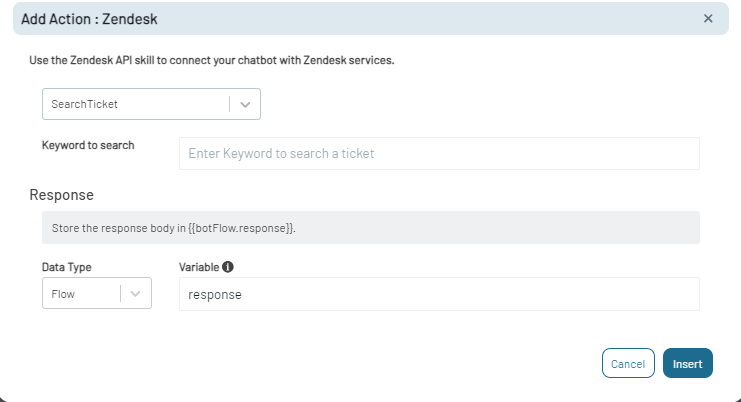
- SearchTicket: To locate existing tickets using keywords.
- UpdateTicket: To modify details of an existing ticket.
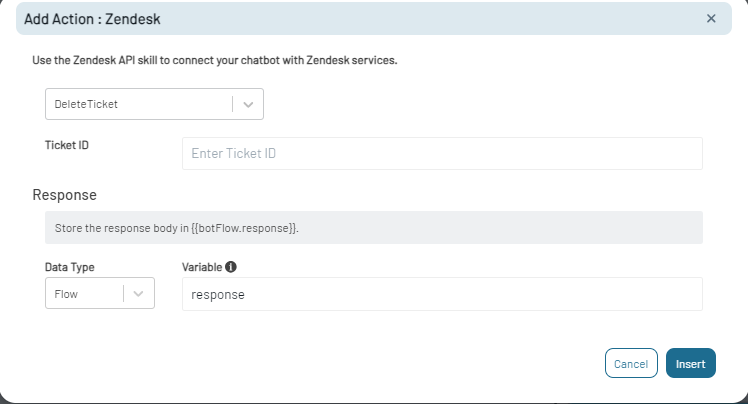
- DeleteTicket: To remove a ticket from Zendesk.
Specify Action Details
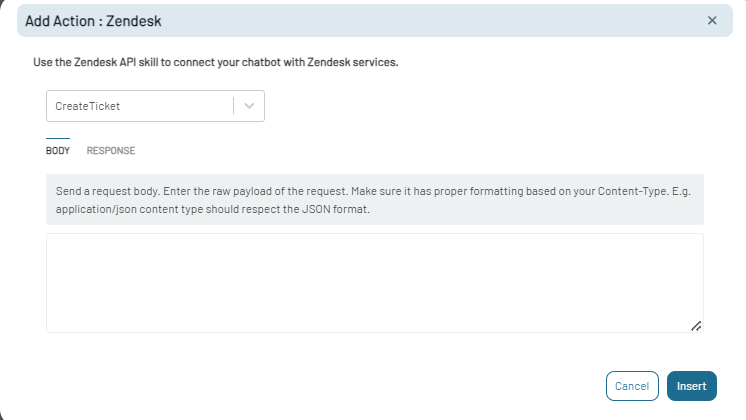
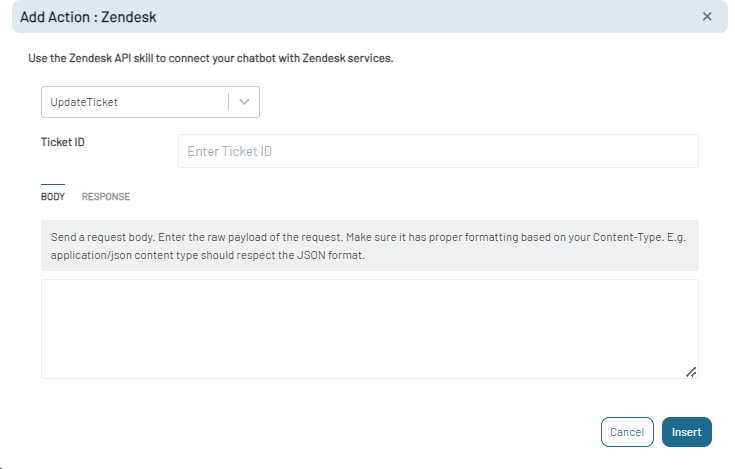
Depending on the action selected, provide the necessary details.
- For CreateTicket, input the JSON payload detailing the ticket information.
- For UpdateTicket, enter the Ticket ID and the JSON payload detailing the ticket information.
- For SearchTicket, provide keywords to find the relevant ticket.
- For DeleteTicket, input the Ticket ID of the ticket you wish to delete.
Set the Response
- In the Response field, choose how the bot should store the response from Zendesk CRM. You can make your bot save the response to a variable for later use in the bot’s conversation flow.
Define Data Storage
- In the Data Type field, select where you wish to store the API responses (Flow or Session).
- Flow: Use this to store data relevant only for the current interaction flow. It's temporary and resets after the conversation ends.
- Session: Use this for data that should persist across the entire session, which lasts until a period of inactivity or the session is explicitly closed.
Specify the Variable Name
- Provide a name for the variable where the API response will be stored. The default variable is typically formatted as
{{botFlow.response}}. - Once you have configured the details, click Insert to add the Zendesk CRM action to your chatbot workflow.
Integrate with HubSpot CRM
(Upcoming)
Integrate with Google SpreadSheet
(Upcoming)